From Sheet Metal to Schnauzer: How It's Made
The process begins with an idea. I get my ideas from observing live animals – sometimes my own or other people's pets, or at the zoo. Then I start sketching. It can often take 15 or 20 iterations before I come up with just the right mix of personality, movement and metal. Once I'm satisfied with the drawing, I scan the image into my computer and create a pattern.

Drill tiny bolt holes:
Many of my pieces use tiny bolts that serve double-duty – they appear as eyes on the front side while holding the finding (pin back or bale) on the back side.

Saw:
I use the pattern as a guide to hand-saw each separate layer. Very fine-toothed blades are used in my jewelers' saw to enable me to make the fine twists and turns necessary.

Smooth and round the edges:
Once the layers are sawed out, I use small files and abrasive to smooth and round off edges. I then create a brushed matte final finish by using 0000 steel wool. Each layer is then sprayed with a protective lacquer to inhibit tarnishing.

Solder if needed:
Others require soldering. This is a heat process in which melted silver solder bonds a finding to the metal.
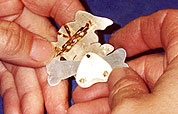
Assemble the piece:
The last step is putting all the pieces together. As mentioned before, I use tiny bolts and screws, fastened by nuts, to attach layers and create movement. This type of joining of the metals is called cold connecting. A small drop of super glue is then placed at the base of each nut to permanently secure the bolt.